Mon, 26 Jan 2009 20:00:00 PST
Hooray, I finally got started on the project! Today's excitement: updating the BIOS and installing the new memory and hard drive.
From Wikipedia:
The BIOS is boot firmware, designed to be the first code run by a PC when powered on. The initial function of the BIOS is to identify, test, and initialize system devices such as the video display card, hard disk, and floppy disk and other hardware.
So you really don't want to mess up when installing a new version of the BIOS, or you may end up with a machine that can't read any media of any sort (including a disk with another BIOS update). It's a very good idea to make sure you've got backup electrical power (whenever you use a computer, but especially for this step). So I charged the laptop's battery as a backup for the AC power.
The newest BIOS for my Toshiba came from the manufacturer's website. The compressed file included disk images for both a boot floppy and a boot CD. (Why does everyone seem to want you to update your BIOS from a floppy disk??? This is 2009, isn't it?) Anyway, I'd already extracted the .iso file for the boot CD and burned it to a disk.
On this computer, there are two ways to boot from a CD. You can go into the BIOS setup and change the boot order to put the CD before the hard disk. Or you can just insert the CD and boot while holding the C key.
Uh... hmm, how do I get the CD drive open when the computer is shut off? Ah! Tiny hole, bent paperclip, click! I powered-up with the C key held down until it started beeping at me, then sat back and twitched while a whole bunch of things happened rather fast. The BIOS was updated and the computer shut off. Whoa.
I removed the CD, turned the computer back on, and went into the BIOS setup. Yup, the new BIOS version number was showing. I let the system boot up the old installation of Windows XP as a test. Success, apparently.
Newegg, where I bought my hardware, has a convenient tool for looking up the correct type of memory for many laptop models. This still left me with a lot of choices, but the customer reviews were really helpful. So I ended up with two 1GB PC2700 units. These are actually rated a bit faster than the PC2100 that the Toshiba is designed for. But several reviewers said they worked in their Toshiba machines, and since the older PC2100 units are hard to find, I decided to give the PC2700 a try.
I powered down the computer, unplugged it, and for good measure removed the battery. I also put myself next to an electrical ground (the center screw of a wall outlet), so that I could discharge myself before accidentally zapping the memory or any of the other computer internals. (A proper grounding strap would have been better, but I don't own one.)
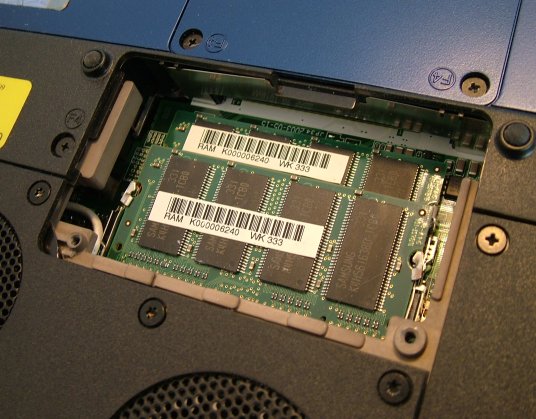
The memory modules are hidden under a small plate on the bottom of the computer:
The little silver spring clips on the sides hold them in, and if you reach in with little teeny fingers and release the springs, the modules pop up:
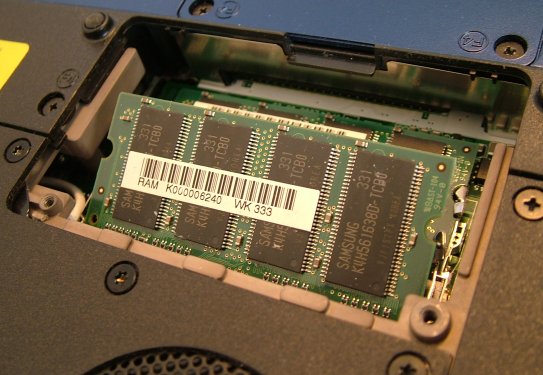
The second module is beneath the first one. I removed both, installed their replacements, replaced the cover, plugged in and powered up. The BIOS reported 2047K of memory, and Windows reported 2GB. Yay! But I wanted a really thorough memory test. Conveniently, one of the options on the Ubuntu Linux installation disk is to run Memtest86+, which gives the memory a serious workout. I let it finish one pass through all its tests (1 hr 43 min), and got zero errors.
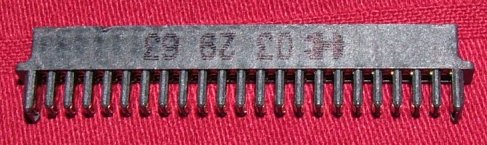
Seagate's "OEM" hard drives (in contrast to those packaged for retail sale) come in an unpadded antistatic bag. I gather this is common for other manufacturers as well. As a result, the connector pins arrive looking like this:
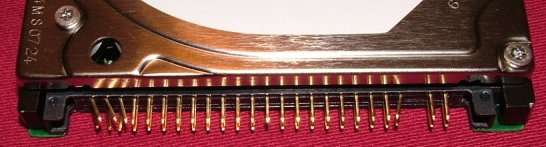
This must be one of the stupidest cost-saving measures in the industry. It could be prevented by sticking the pins into a teeny strip of conductive foam before packaging. Grr! Anyway, the pins were straightenable using a magnifying visor and the itty bitty tweezers from a Swiss Army knife.
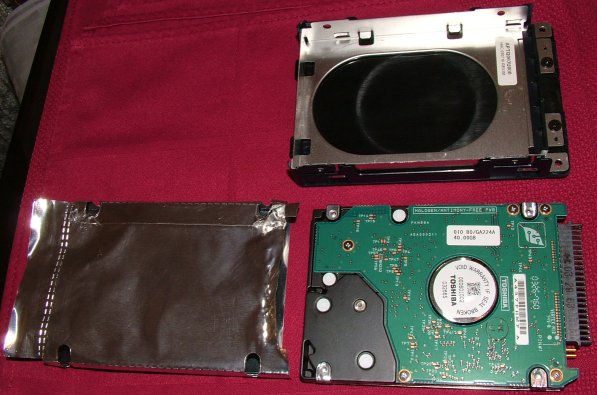
Time to remove the old hard drive. It's mounted in a bracket which is attached to a removable panel on the bottom of the computer. It looks like this once it's out:
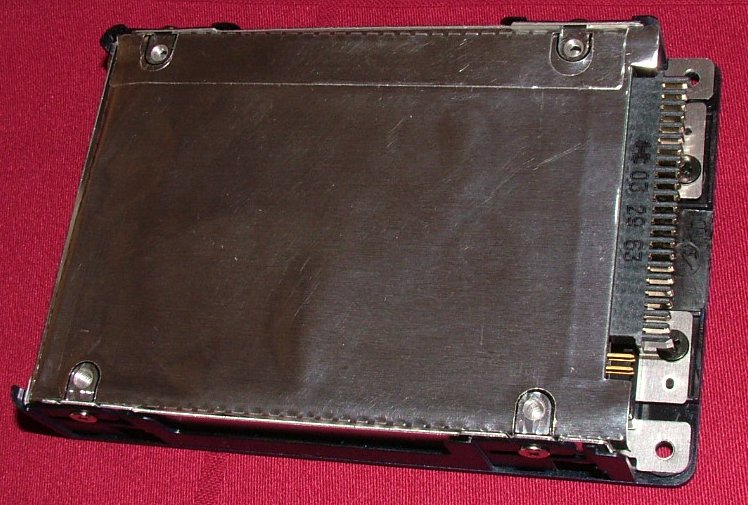
Four screws hold the drive in its bracket. But there's bad news: the old drive is wrapped in a shield made of extra-heavy aluminum foil. This shield needs to be removed from the old drive and installed on the new one.
I thought that would take forever, but in fact the shield was glued to the hard drive only in one place: a thin strip just behind the pins. I used a small knife (very slowly and carefully!) to separate the shield from the drive's circuit board where it was glued. Then I opened up the opposite end of the shield, and pushed the drive out.
At this point I noticed something that bothered me. The aluminum foil had been gummed to the old drive's circuit board right on top of a bunch of exposed copper pads.
The inside of the foil shield, on the side where it contacts the circuit board, was protected by a black plastic insulating layer... everywhere except where it was glued. That was just weird. Why would you want to short out all those conductors via the aluminum shield? Maybe the glue layer itself had provided enough insulation to prevent this.
Well, the glue layer was a real mess after my knife-prying. Worse yet, the new drive had its pin header soldered to the board right where the bare foil would fall.
Hmm.
Nah, that just couldn't be right. Even if it was okay for some reason on the old drive, I wasn't willing to risk shorting out my new drive. I cut a piece of electrical tape and folded it over the edge of the shield so that it would cover the exposed, previously-gummed, aluminum on the inside:

One more thing: there was a little adapter on the pins of the old drive:
I carefully coaxed it off with a thin-bladed screwdriver, and installed it on the same pins of the new drive.
That left the reassembly. I pushed the new drive through the foil shield, pin end first (because you can't push on the pin end very easily). It was a very tight fit and took a lot of thumb force, but eventually it slid into position.
But I noticed one last problem as I was doing that: the new drive had a breather hole that was not supposed to be covered, and the foil shield lacked a hole in that spot. So I cut one with little scissors.
All that remained was to screw the new drive into the bracket, put it in the computer, and turn it on. Of course I got an error message ("Media test failure, check cable") as the system tried to boot itself from a completely blank hard drive. But the BIOS Setup screen showed a "ST9120822A-(PM)" hard disk, which matched the identification number printed on the drive's label. And the drive itself made little hard-disk sounds. So I believe I was successful.
Next, I'll find out if I can partition the drive and install some operating systems.
Copyright © 2009 William S. Statler (except for quotes and
contributions from other authors). This work is licensed under a
Creative Commons Attribution-Noncommercial-Share Alike 3.0 United States License
which grants limited rights of non-commercial distribution and reuse. Please read
http://creativecommons.org/licenses/by-nc-sa/3.0/us/
for details. All other rights reserved.